 Save
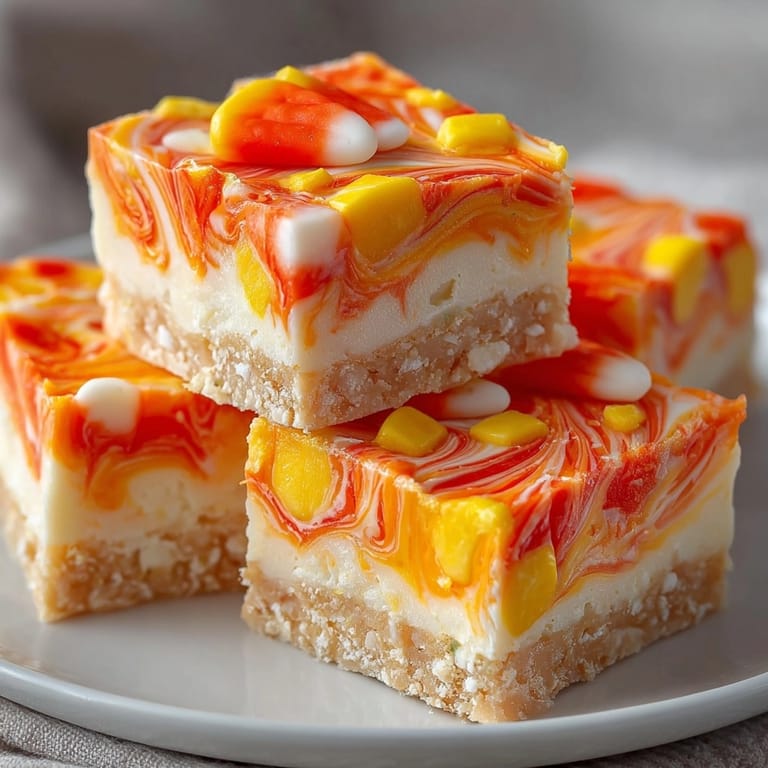
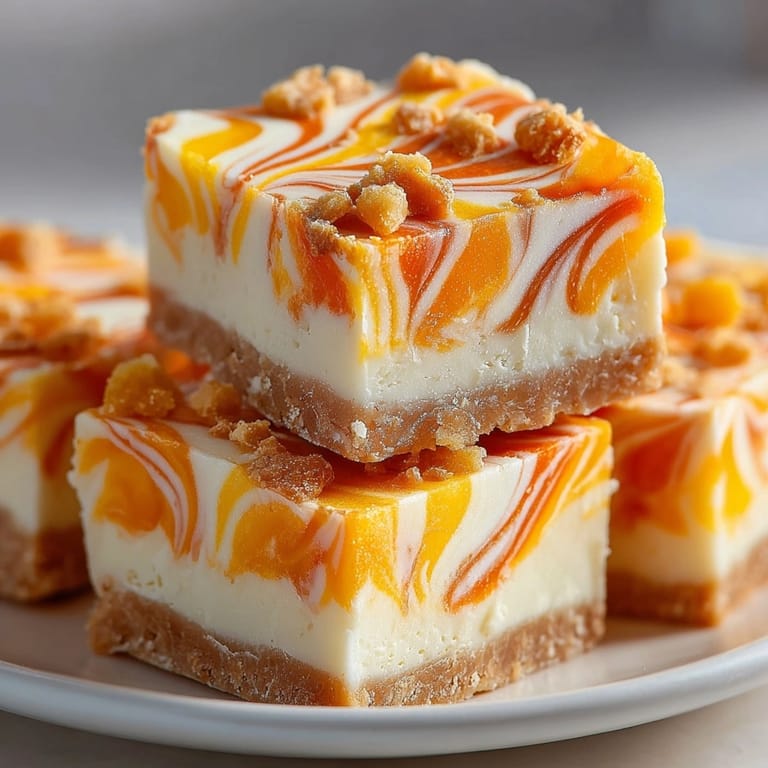
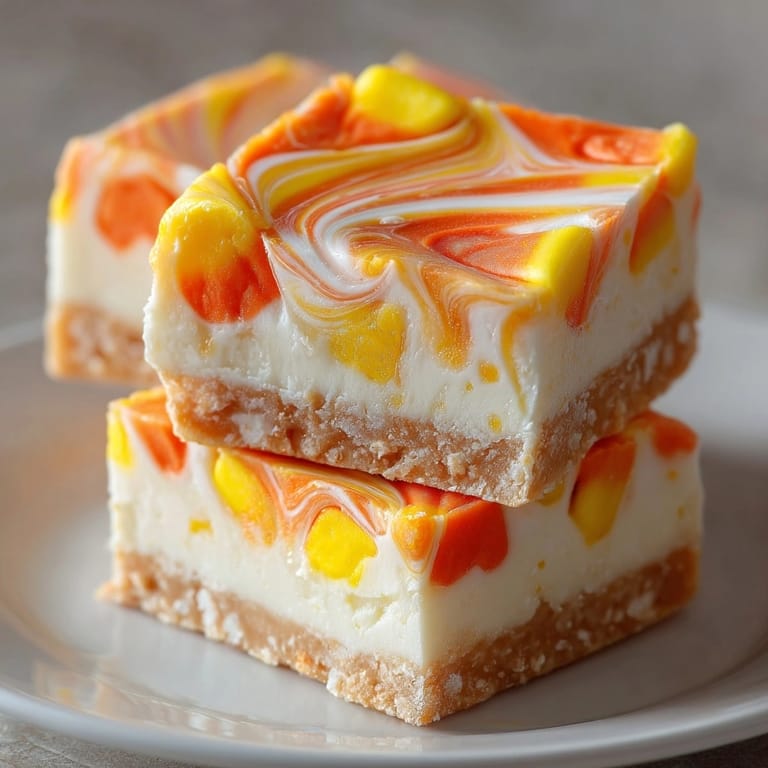
Save Candy Corn Fudge Swirl is your shortcut to a show-stopping Halloween treat that is as fun to make as it is to eat. Creamy white chocolate fudge comes alive in bright orange and yellow layers marbled together, then decked out with bits of real candy corn for maximum party flair.
The first time I made this was for a neighborhood Halloween potluck. The kids called it unicorn fudge and devoured every piece before dinner. Now it is my go-to for fall gatherings.
Ingredients
- White chocolate chips: give rich creamy sweetness be sure to choose a good quality brand that melts smoothly
- Sweetened condensed milk: creates silky texture and reliable setting double check for undented cans
- Unsalted butter: brings depth and that classic fudge melt make sure it is fresh for best flavor
- Pure vanilla extract: rounds out flavor with warm notes avoid imitation vanilla if possible
- Pinch of salt: balances the sweetness a little goes a long way
- Yellow gel food coloring: delivers vivid color without thinning the fudge look for gel instead of liquid type
- Orange gel food coloring: makes the swirl unmistakably candy corn
- Chopped candy corn (optional): adds crunch and on theme fun I pick fresh bags so the candy is soft
Tired of Takeout? 🥡
Get 10 meals you can make faster than delivery arrives. Seriously.
One email. No spam. Unsubscribe anytime.
Instructions
- Prep the Pan:
- Line your eight by eight inch baking pan with parchment paper leaving extra over the sides so you can lift the fudge easily. Smoothing out wrinkles helps with perfect square edges.
- Melt the Base:
- In a medium saucepan add white chocolate chips sweetened condensed milk and butter. Place over low heat and stir constantly with a rubber spatula as everything melts together. Do not rush this step. The goal is a smooth glossy mixture with no lumps and no browning on the pan bottom.
- Flavor and Divide:
- Take the pan off the heat and immediately stir in vanilla extract followed by a pinch of salt. Give it a final stir for even flavor. Pour the fudge into three even portions using heatproof bowls. Work quickly since the fudge thickens as it cools.
- Color the Layers:
- Leave one bowl plain for the white layer. Into the second bowl add orange gel food coloring using a toothpick if needed start with a tiny bit for vibrant results and stir well. In the third bowl repeat with yellow gel food coloring.
- Build and Swirl:
- Spread the yellow fudge evenly across the prepared pan using an offset spatula or back of a sturdy spoon. Smooth to cover every corner. Carefully spoon the orange fudge in a layer over the yellow then smooth again. Finish with the white fudge. For the signature swirl effect drag a skewer or butter knife through all three layers making figure eights but not too much swirling or the colors will blend.
- Top and Set:
- If you love the crunch and color scatter chopped candy corn over the top and press gently so it sticks. Slide the pan into the fridge on a flat surface. Chill at least two hours until the fudge is completely firm. Patience here keeps your squares sharp and clean.
- Cut and Serve:
- Lift the block of set fudge from the pan using the parchment handles. Place on a large cutting board. Dip a sharp knife in hot water and wipe dry before each cut to get neat squares. Enjoy immediately or wrap for gifting.
 Save
Save My favorite part is the white chocolate fudge base it holds colors without bleeding and sets up gorgeously every time. When we make it together my youngest loves pressing the candy corn pieces into the warm fudge just before it goes in the fridge so every bite feels special.
Storage Tips
Store cut squares in an airtight container in the refrigerator for up to five days. If stacking layers, separate with wax paper so the pieces do not stick. Fudge is best served at cool room temperature if your house is not too warm for creamy texture.
Ingredient Substitutions
If white chocolate chips are unavailable choose chopped white baking bars but avoid almond bark which can taste artificial. For a different pop of color try natural food colors or swap in dried fruit instead of candy corn on top for a less sweet finish.
Serving Suggestions
Arrange fudge squares on a platter for a Halloween movie night or package individually in clear bags tied with orange ribbon for trick or treaters. They also dress up a mug of hot cocoa or round out a fall dessert charcuterie board.
 Save
Save Swirling is an easy chance for kids to join in and add their creative signature. I always encourage a few bold zig zags so every batch looks different and gets plenty of ooohs and aaahs.
Recipe Guide
- → How do I achieve the marbled swirl effect?
Layer colored fudge mixtures gently, then use a skewer or butter knife to swirl for a marbled look—avoid overmixing for distinct colors.
- → Can I use baking chocolate instead of chips?
Yes, substitute white chocolate chips with high-quality white baking chocolate for a richer texture and deeper flavor.
- → Is it necessary to add chopped candy corn?
No, adding chopped candy corn is optional, but it adds festive flair and extra sweetness to the finished squares.
- → Can this dessert be made ahead of time?
Absolutely; prepare, chill, and store in an airtight container up to 5 days ahead for convenience and freshness.
- → Are there nut-free alternatives for added texture?
Add mini marshmallows or crispy rice cereal instead of nuts for an allergy-friendly texture variation.
- → What tools simplify preparation?
Use parchment paper for easy removal and mixing bowls for separating and coloring layers—simple and effective!