 Save
Save Last summer, I was packing a hiking backpack when my friend casually mentioned she'd been buying those expensive trail mix bars from the fancy grocery store every week. Something about the way she said it—like they were some kind of luxury—made me laugh and immediately want to prove we could make them better at home. Three hours later, my kitchen smelled like toasted honey and melted butter, and I had a pan of these golden bars cooling on the counter that were somehow both chewy and satisfying in a way the store-bought ones never were.
I made a double batch one rainy afternoon specifically to send with my sister on a long road trip, and she texted me three days later saying she'd rationed them like they were gold because she didn't want to run out. That's when I knew these weren't just snack bars—they were the kind of thing that made people feel cared for, even when it was just a simple thing wrapped in foil.
Ingredients
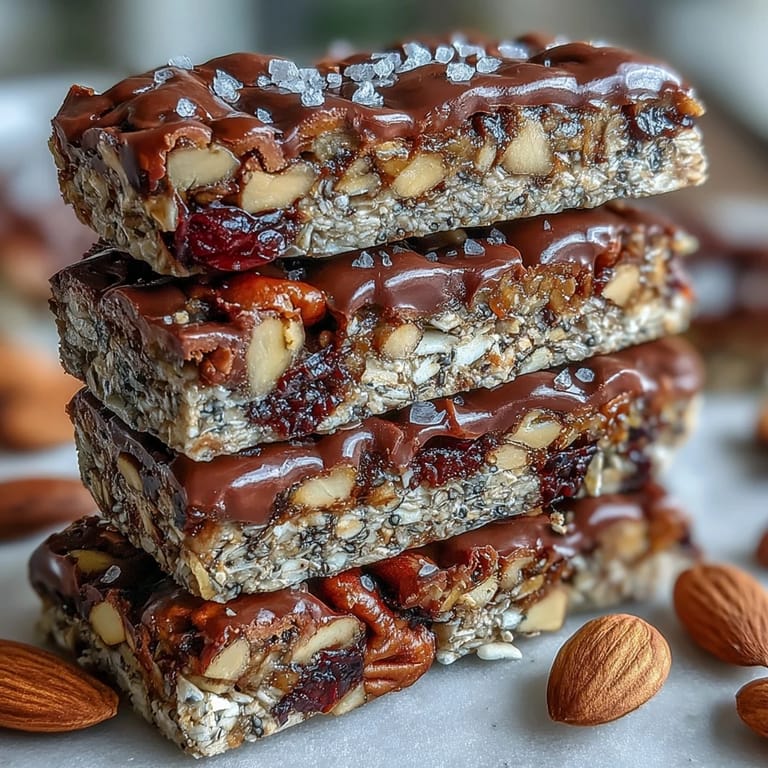
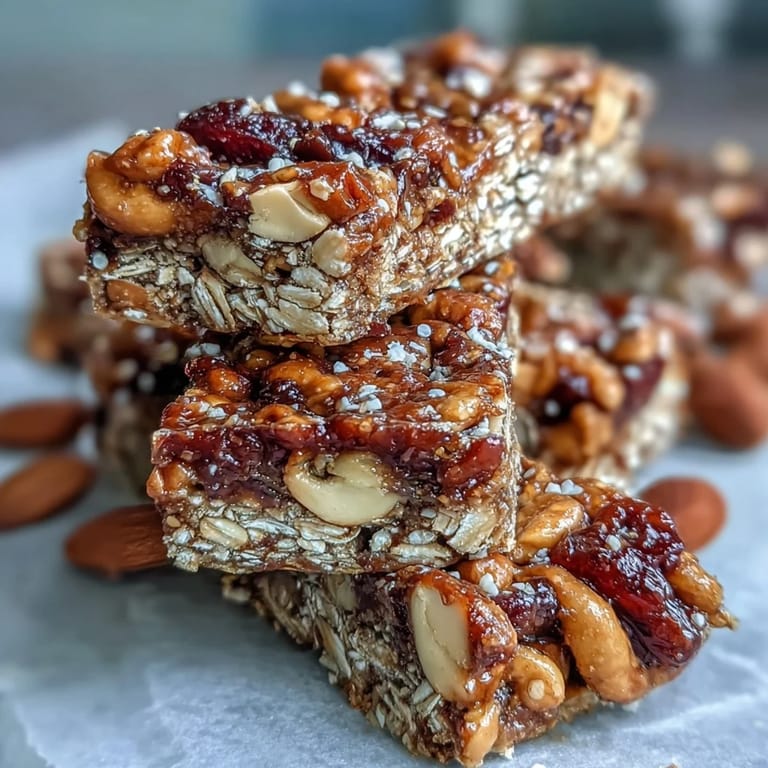
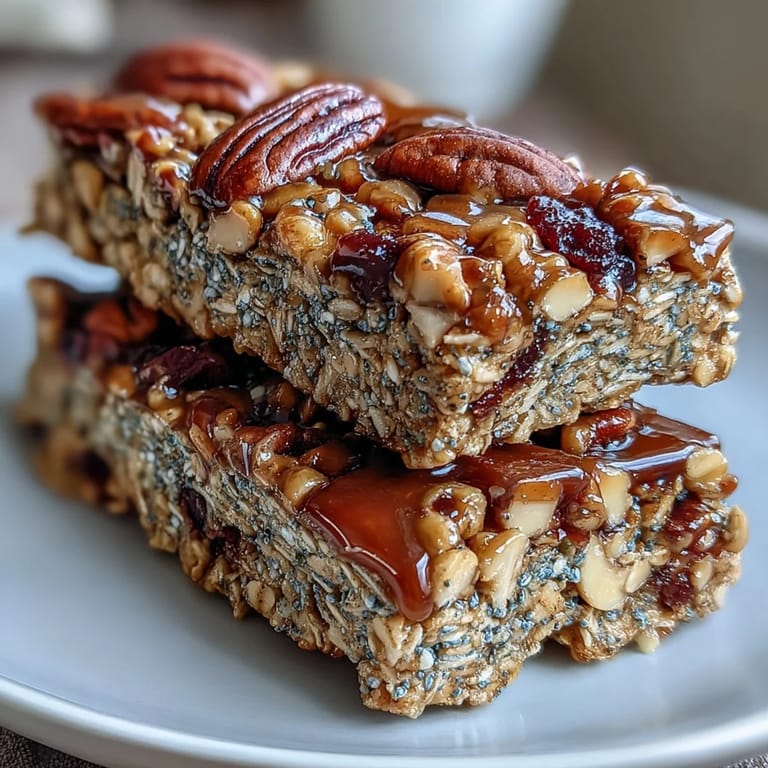
- Old-fashioned rolled oats (2 cups): Don't use instant oats here—they'll turn to mush and you'll end up with bars that feel mushy instead of chewy and substantial.
- Mixed nuts (1/2 cup chopped): Almonds, walnuts, or pecans all work beautifully; I chop them by hand because it gives you better texture control than a food processor.
- Seeds (1/3 cup sunflower or pumpkin): These add a nutty crunch and sneak in extra nutrition without anyone really noticing.
- Dried fruit (1/2 cup cranberries or raisins): Cranberries give you a little tart bite that balances the sweetness, but honestly, use whatever dried fruit you love.
- Mini chocolate chips (1/4 cup optional): I include them because they melt slightly during baking and create these little pockets of comfort throughout.
- Honey (1/3 cup): This is your binder and your sweetener—it's what makes these bars hold together and taste like they're meant to be eaten while sitting on a hillside.
- Unsalted butter (1/4 cup): Melted together with honey, it creates that golden, slightly crispy exterior while keeping the inside chewy.
- Light brown sugar (1/4 cup packed): The molasses in brown sugar adds depth that white sugar just can't give you.
- Vanilla extract (1/2 tsp): A small amount, but it rounds out all the flavors and makes everything taste more intentional.
- Salt (1/4 tsp): This tiny pinch is what makes people pause mid-chew and wonder why these taste so good.
Tired of Takeout? 🥡
Get 10 meals you can make faster than delivery arrives. Seriously.
One email. No spam. Unsubscribe anytime.
Instructions
- Get Your Pan Ready:
- Preheat your oven to 350°F and line an 8-inch square pan with parchment paper, letting it hang over the edges so you can lift the whole thing out later without wrestling with it. This small step saves you from broken bars and ruined fingernails.
- Mix Your Dry Ingredients:
- In a large bowl, combine the oats, chopped nuts, seeds, dried fruit, and chocolate chips if you're using them. The mixing is meditative—you're basically just making sure everything is distributed so no bite is all nuts and the next one is all oats.
- Warm the Honey and Butter:
- In a small saucepan over medium heat, melt the butter, honey, and brown sugar together, stirring occasionally until it's smooth and glossy. The whole thing should take about three minutes, and you'll notice the kitchen smelling like caramelized sweetness—that's exactly right.
- Bring It All Together:
- Pour that warm, golden mixture over your dry ingredients and mix thoroughly until everything is coated and clumping together. You want to make sure no dry oats are hiding at the bottom of the bowl.
- Press and Bake:
- Transfer the mixture to your prepared pan and press it down firmly with a spatula or your hands—don't be shy about this part, because a loosely packed mixture will crumble when you cut it. Bake for 18 to 20 minutes until the edges are golden brown and the whole thing looks set but still slightly soft to the touch.
- Cool and Cut:
- Let the bars cool completely in the pan (this is important, or they'll fall apart when you cut them), then use the parchment overhang to lift them out. Cut into 12 bars with a sharp knife, wiping the blade between cuts if the mixture sticks.
 Save
Save One evening, I brought a tin of these to my neighbor who had just gotten home from the hospital, and watching her face light up when she opened it reminded me that sometimes the most meaningful thing you can do is put actual effort into feeding someone. She kept the tin to use for storing buttons, which felt like the highest compliment.
Customizing Your Bars
The beauty of this recipe is that it's genuinely flexible without falling apart—which is not true of all recipes, but it's true of this one. I've made versions with coconut flakes swapped for some of the nuts, bars loaded with white chocolate chips instead of dark, and even a version where I used maple syrup instead of honey because I was out of honey and too lazy to go to the store. Every version has been delicious, which tells me the formula is solid and your instincts are probably right.
Storage and Longevity
These bars stay fresh in an airtight container for up to a week, though honestly, they rarely last that long in my house. If you want to make them ahead, they freeze beautifully for up to three months—I once made a triple batch in January and pulled them out all winter whenever I needed a quick breakfast or an emergency snack. Room temperature is always better than cold straight from the fridge, so pull them out a few minutes before eating if you've stored them that way.
Making Them Your Own
The first few times you make these, follow the recipe as written so you understand how the textures work together and what's actually essential. After that, feel free to play around—swap dried cranberries for dried blueberries, use pecans instead of walnuts, add a pinch of cinnamon if you're feeling it. These bars are more forgiving than you'd expect.
- For a vegan version, swap the butter for coconut oil and the honey for maple syrup, and everything works just as well.
- If you're dealing with nut allergies, double up on seeds and dried fruit instead—the bars will be equally delicious and maybe even more interesting.
- A drizzle of melted chocolate on top after they cool is optional but absolutely worth considering.
 Save
Save These bars remind me why homemade food matters—it's not about being perfect or impressive, it's about knowing exactly what's inside and being able to make something better than what you can buy. Every bite tastes like someone cared enough to do the work.
Recipe Guide
- → Can I substitute the nuts?
Yes, you can swap mixed nuts for other types like pecans, cashews, or even seeds to suit taste or dietary needs.
- → How do I make these bars vegan?
Replace butter with coconut oil and honey with maple syrup to create a vegan-friendly version.
- → What is the best way to store the bars?
Keep them in an airtight container at room temperature for up to one week to maintain freshness and texture.
- → Can I add chocolate chips?
Yes, mini chocolate chips add a touch of sweetness and pair well with the nuts and dried fruit.
- → How do I ensure the bars hold together well?
Press the mixture firmly into the pan before baking and allow it to cool completely to help them set firmly.
- → Are these bars gluten-free?
The bars contain oats which may have gluten cross-contact; use certified gluten-free oats to ensure gluten-free status.