Save
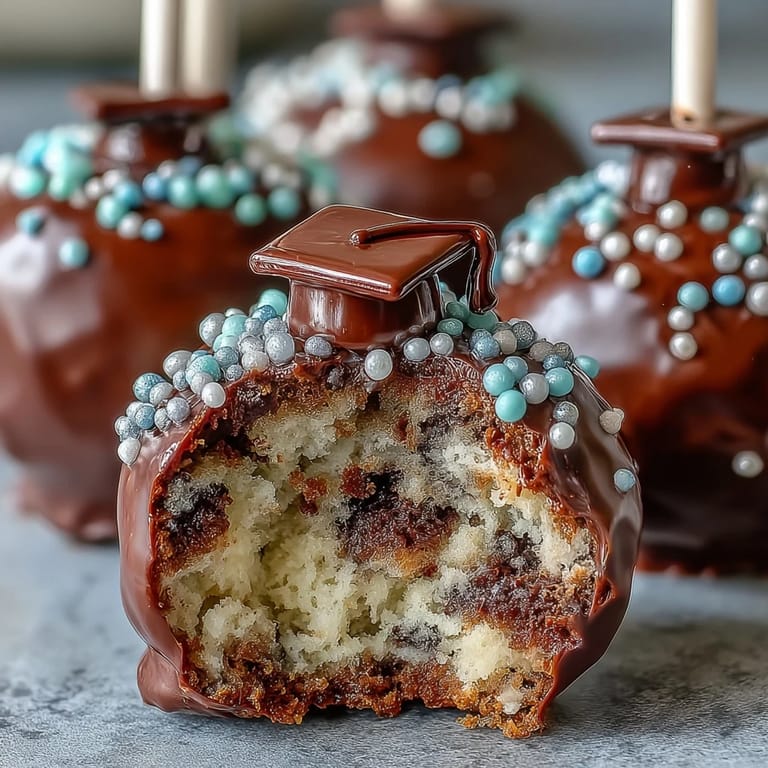
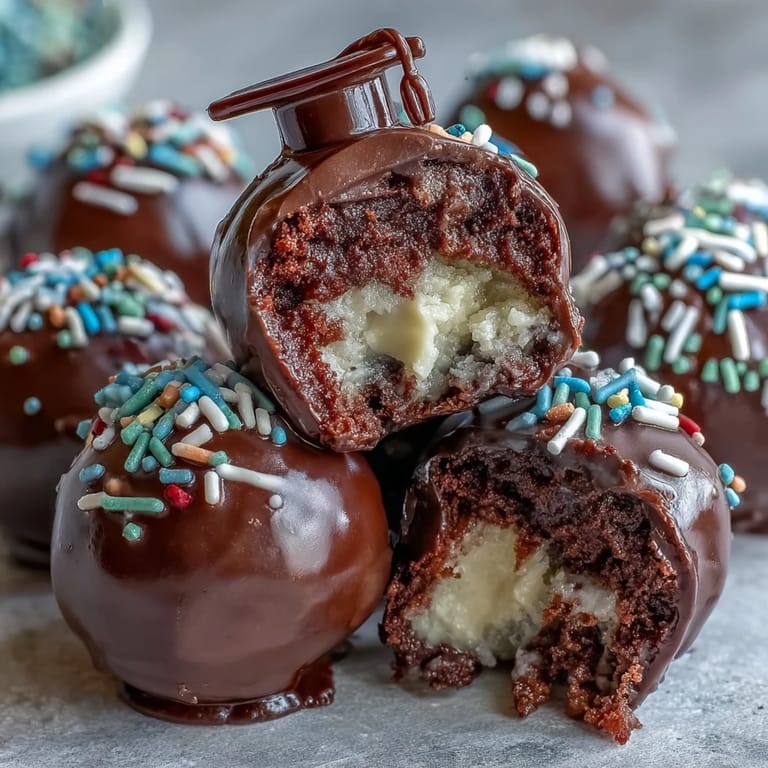
Save The cracked sound of cake breaking apart in my hands always reminds me of the chaotic excitement bubbling in the kitchen whenever graduation season rolls around. One afternoon, just before my cousin finished high school, we turned our kitchen into a creative studio, carefully matching candy melts to her school colors while laughing over the mess we'd made. It was surprisingly therapeutic to roll the fragrant crumbs with creamy frosting, and I found myself glancing out the window, watching graduates pass by in their proud caps and gowns. Decorating cake pops felt more like an art project than baking, especially as we debated which sprinkle combinations looked best. Every batch promised a handful of completely unique pops—no two ever quite alike, and that's part of the fun.
I remember being surrounded by balloons and streamers, carefully lining up finished cake pops as the kitchen steadily filled with friends and family. My aunt nearly dipped her sleeve in melted chocolate while admiring how glossy the coating became after a little shortening—her laughter instantly put everyone at ease. The moment the pops dried, we started competing to see who could assemble the cutest graduation cap, and even Grandpa joined in to add a sprinkle or two. That simple kitchen camaraderie made the treats even sweeter for our celebration.
Ingredients
- Vanilla or chocolate cake mix: Whether boxed or homemade, the cake is your flavor foundation—just make sure it's completely cooled before crumbling.
- Cream cheese frosting or buttercream: Start with a little and add gradually—the frosting brings just enough moisture to bind the crumbs into smooth, rollable balls without making them sticky.
- Candy melts in school colors: These give a fun, festive look and are much easier to melt than standard chocolate; use shortening if you need a silkier finish.
- Sprinkles, edible glitter, colored sugar: Don't hold back here—the decorations really bring your pops to life and let you match any school colors.
- Lollipop sticks: The classic cake pop handle, but I've learned to double-check they're food-safe before assembling.
- Mini chocolate chips: Tiny but mighty—perfect for creating whimsical tassel accents.
- Fondant in school colors: Optional, but a great way to sculpt little graduation caps with a professional flair.
Tired of Takeout? 🥡
Get 10 meals you can make faster than delivery arrives. Seriously.
One email. No spam. Unsubscribe anytime.
Instructions
- Bake and Cool the Cake:
- Prepare your cake according to the package or recipe and let the aroma fill the kitchen, then cool completely so the crumbs aren't sticky.
- Crumble the Cake:
- Using clean hands, break the cooled cake into fine crumbs—it's oddly satisfying and ensures an even texture in your pops.
- Mix with Frosting:
- Add frosting gradually; you want the mixture to stick together quietly without turning mushy.
- Shape the Balls:
- Scoop tablespoon-sized amounts and roll between your palms—the warmth helps smooth each ball perfectly.
- Chill the Cake Balls:
- Set them on a baking sheet and refrigerate for at least an hour or freeze for twenty minutes to firm them up.
- Melt the Candy Coating:
- Microwave in thirty-second bursts, stirring often; if it gets too thick, add a dab of shortening for perfect dip-ability.
- Insert Lollipop Sticks:
- Dip the ends in melted chocolate, then gently push halfway into each chilled cake ball to help them stay put.
- Dip and Coat Cake Pops:
- Submerge each pop in melted candy, gently tap off any excess, and admire the glossy finish before decorating.
- Add Decorations:
- While the coating is still wet, shower the pops with sprinkles or colored sugar; stick fondant squares on top and mini chips for cap and tassel details.
- Set Pops Upright:
- Let them stand in a styrofoam block and wait patiently for the coating to harden—it’s worth the suspense!
 Save
Save The sight of everyone holding a colorful cake pop in hand during group photos made me realize these treats were more than just a dessert—they became a part of every happy memory that day. Watching guests giggle as they compared the designs, it was clear our creativity had sparked some lasting smiles.
How to Keep Cake Pops Fresh
I once made these ahead of a party and learned that storing them upright in a styrofoam block helped maintain their shape and shine. Proper storage in an airtight container keeps them soft inside while preventing the decorations from smudging.
Fun Ways to Personalize Your Pops
Personalizing each cake pop with edible markers or by mixing and matching school colors made for fun conversation starters at the table. Even small touches, like gold glitter for honor students or writing the graduation year, turned ordinary pops into treasured keepsakes.
Troubleshooting & Last-Minute Fixes
If you notice cracks or uneven coating, patch them with an extra dab of melted chocolate and decorate right over. A cooling rack can help if you run out of stands. Keeping extra candy melts on hand also prevents last-minute panic when making bigger batches.
- Don’t skip the chilling step—it’s crucial for sturdy pops.
- Match stick lengths to your display container for best presentation.
- Give your pops plenty of space while setting so they don’t bump and smudge.
 Save
Save Sharing these graduation cake pops feels like gifting a bite-sized celebration to everyone in the room. Here’s to creativity, color, and sweet memories baked right into each pop!
Recipe Guide
- → How do I customize cake pops to match school colors?
Use colored candy melts or white chocolate with food coloring, plus coordinating sprinkles and fondant for caps.
- → Can I make cake pops ahead of time?
Yes, you can make them in advance. Store in an airtight container at room temperature for up to 3 days or refrigerate up to a week.
- → What type of cake works best?
Vanilla or chocolate cake, whether homemade or from a mix, both create a moist texture for cake pops.
- → How can I ensure smooth chocolate coating?
Melt candy melts in short bursts and add vegetable shortening if needed to thin the chocolate.
- → Are these treats suitable for vegetarians?
Yes, they are vegetarian. To make gluten-free, use a gluten-free cake mix and check all decoration ingredient labels.
- → Can I add graduation year to the pops?
Yes, use edible markers to write the graduation year on the pops for personalized decoration.